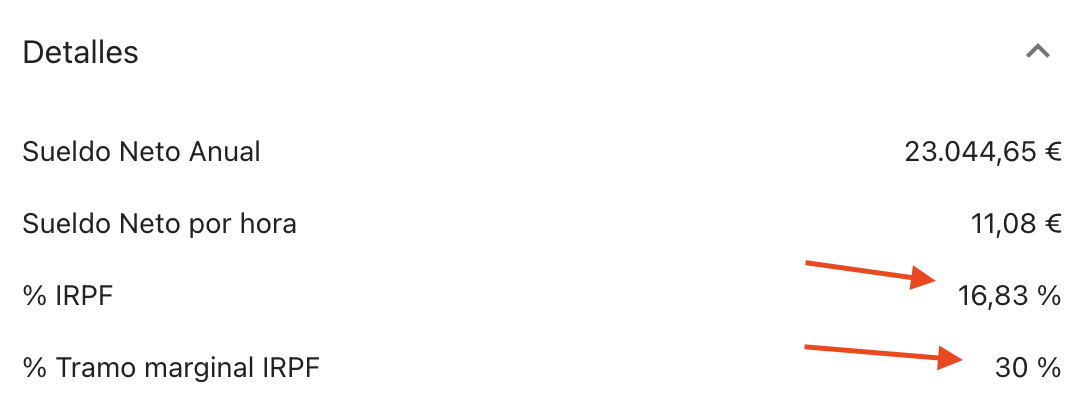
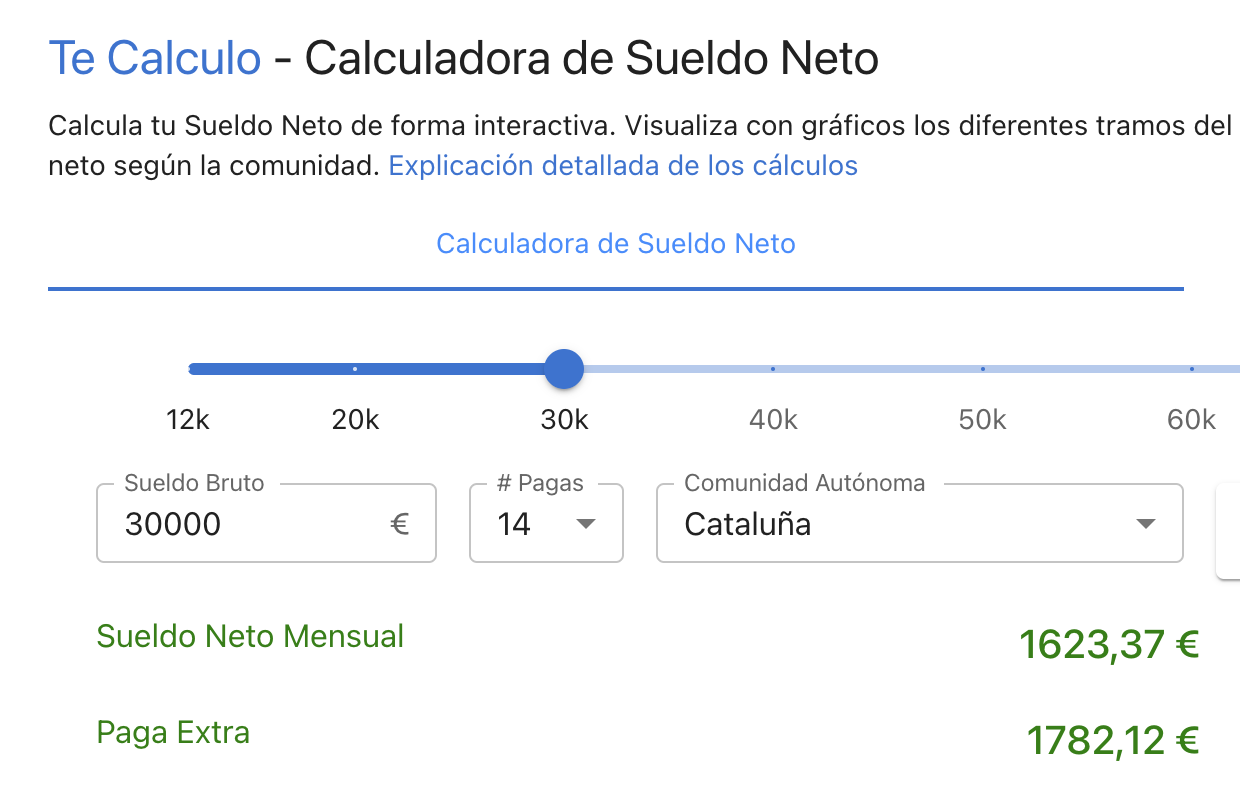
Tengo la manía tonta de querer entender mejor las cosas que me afectan. Después de sumergirme en el cálculo del sueldo neto, con su correspondiente calculadora, la cúal nunca esta lo suficientemente actualizada como bien se encargan de recordarme cada vez que hago algo de SPAM. Estos últimos meses he estado trabajando en una calculadora de la cuota mensual de la hipoteca. O en corto, que tiene mejor SEO:
Tengo una hipoteca desde hace un año y medio y es todo un mundo. Cuando empecé a buscar bancos y preguntar a amigos te das cuenta de los mitos y creencias. Los que más me sorprendieron fueron:
En el momento que contraté la hipoteca, los tipos estaban por los suelos y llevaban años así. Se podían conseguir hipotecas tipo fijo a 1 y pico % de interés. Pues aún así muchos amigos me recomendaban variable. Los variablelivers decían su mantra: “¡El euríbor no va a subir!”. Que rápido se les ha complicado la cosa…
Valor histórico del euríbor
Año | Valor |
2022 | 3,018% |
2021 | -0,487% |
2020 | -0,481% |
2019 | -0,272% |
2018 | -0,147% |
2017 | -0,189% |
Otra fauna muy común, tiene un mandamiento que pregonan: “¡En cuanto ahorres algo amortiza!” “¡Tienes que quitarte el préstamo cuánto antes!”. A ver, no siempre. Y para muestra mi propio caso. Mi hipoteca es 1,6% tipo fijo. Mientras escribo estas líneas hay dépositos al 2%. Gano 0,4% anual sin riesgo. ¿Amortizo? ¿De verdad? luego esta la inflación, todo será más caro dentro de 30 años, también cobraré más (espero) pero, ¿la cuota mensual? será la misma. Al final lo de amortizar es sencillo, si tienes el dinero muerto del asco en la cuenta, amortiza. Si le sacas mejor rendimiento que los intereses de tu hipoteca, no amortices.
Finalmente, también me encontré alguno que tenía tipos muy muy bajos y yo sorprendido, ¿cómo lo habrán conseguido? A la que rascas un poco se descubre el pastel. Tenían contratado con el banco hasta ¡la alarma de la casa! Seguro de casa, alarma, seguro de vida, seguro de pagos, ¿quién da más? y estos seguros metidos en la deuda total, para cobrar sus buenos intereses también sobre ellos. El coste real de la hipoteca mes a mes era muy diferente al de contabilizar solo el tipo de interés. Hablaré de eso más adelante pero spoiler: los seguros que ofrece el banco son más caros y peores (combo).
Sea como sea, si lo que te comento te suena a chino, quédate y intento resolver tus dudas. Abre la calculadora de hipoteca en otra pestaña del navegador y ve jugando.
Las hipotecas en España son del tipo préstamo francés. La gracia de este tipo de préstamo es que las cuotas son las mismas durante toda la vida del préstamo, lo que ayuda a evitar imprevistos etc. Eso los ha hecho los más comunes. Esto me lleva a otro mito muy extendido. “En las hipotecas se pagan muchos más intereses al principio que al final” y bueno si es cierto que se paga más pero el único motivo es porque debes más! Si la cuota siempre es la misma y tú al banco al inicio le debes TODO es normal que pagues más intereses, vamos con un ejemplo para entenderlo mejor.
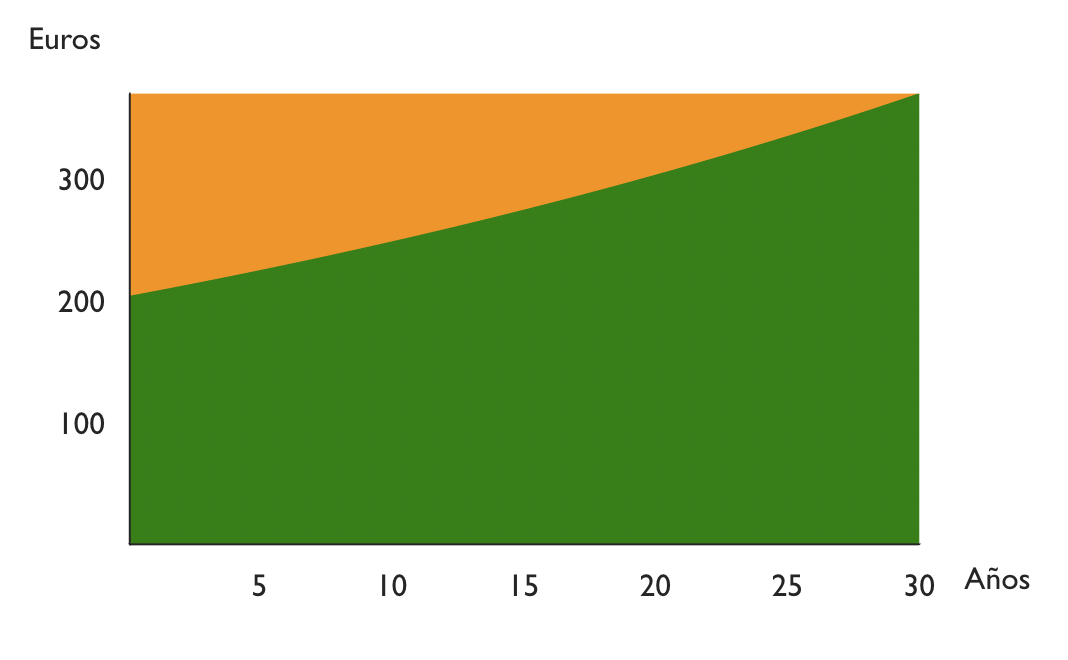
Imagina un préstamo de 100.000 a 10 años, con un interés del 1%. Números redondos para facilitar cálculos. Los intereses son anuales así que el primer año le tienes que pagar al banco el 1% de 100.000€. Es decir 1000€ euros. Dividido entre 12 meses, 83,3€ mensuales. El resto de cuota es la deuda que la vas reduciendo, en este caso 876,04€ - 83,3€ = 792,74€ mensuales. 9512,88€ anuales.
Ahora vamos al año dos. La deuda es ahora el resultado de restar la dueda inicial menos lo pagado el primer año, es decir 100.000€ - 9512,88€ = 90.487,12€. Los intereses del segundo año son entonces el 1% de esa cifra, es decir 904,87€. Cada mes solo 75,41€. Ha bajado unos 8 euros con respecto al año anterior (83,3€). ¿Se ve la tendencia? Cada año pagas menos intereses porque vas reduciendo tu deuda.
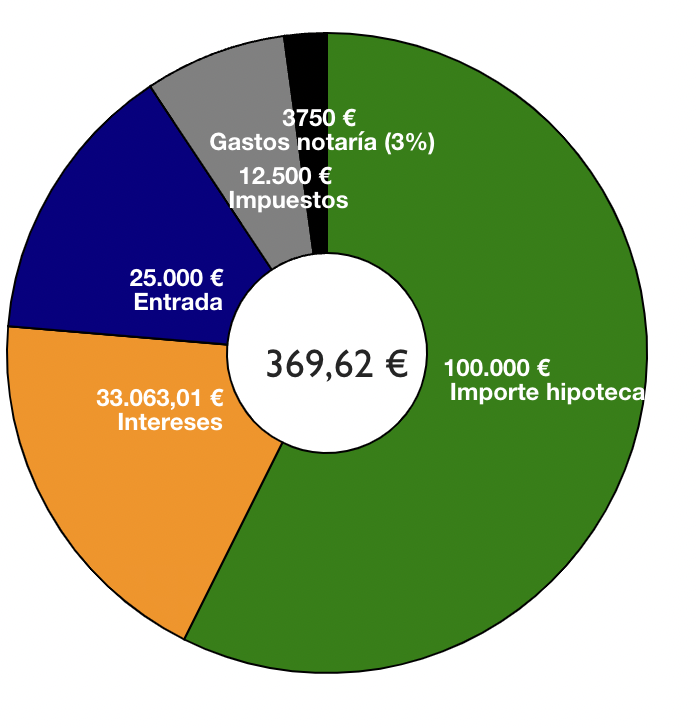
Por norma general, el banco te va a dar una hipoteca de como máximo el 80% del valor de la vivienda. Este valor se obtiene mediante tasación. Si el precio de venta es menor al de tasación se usará ese valor. Siempre el mínimo de esos valores (venta o tasación). Además el 80% se da si es tu primera vivienda, donde te vas a empadronar. Para una segunda vivienda el máximo valor de la hipoteca es 70%.
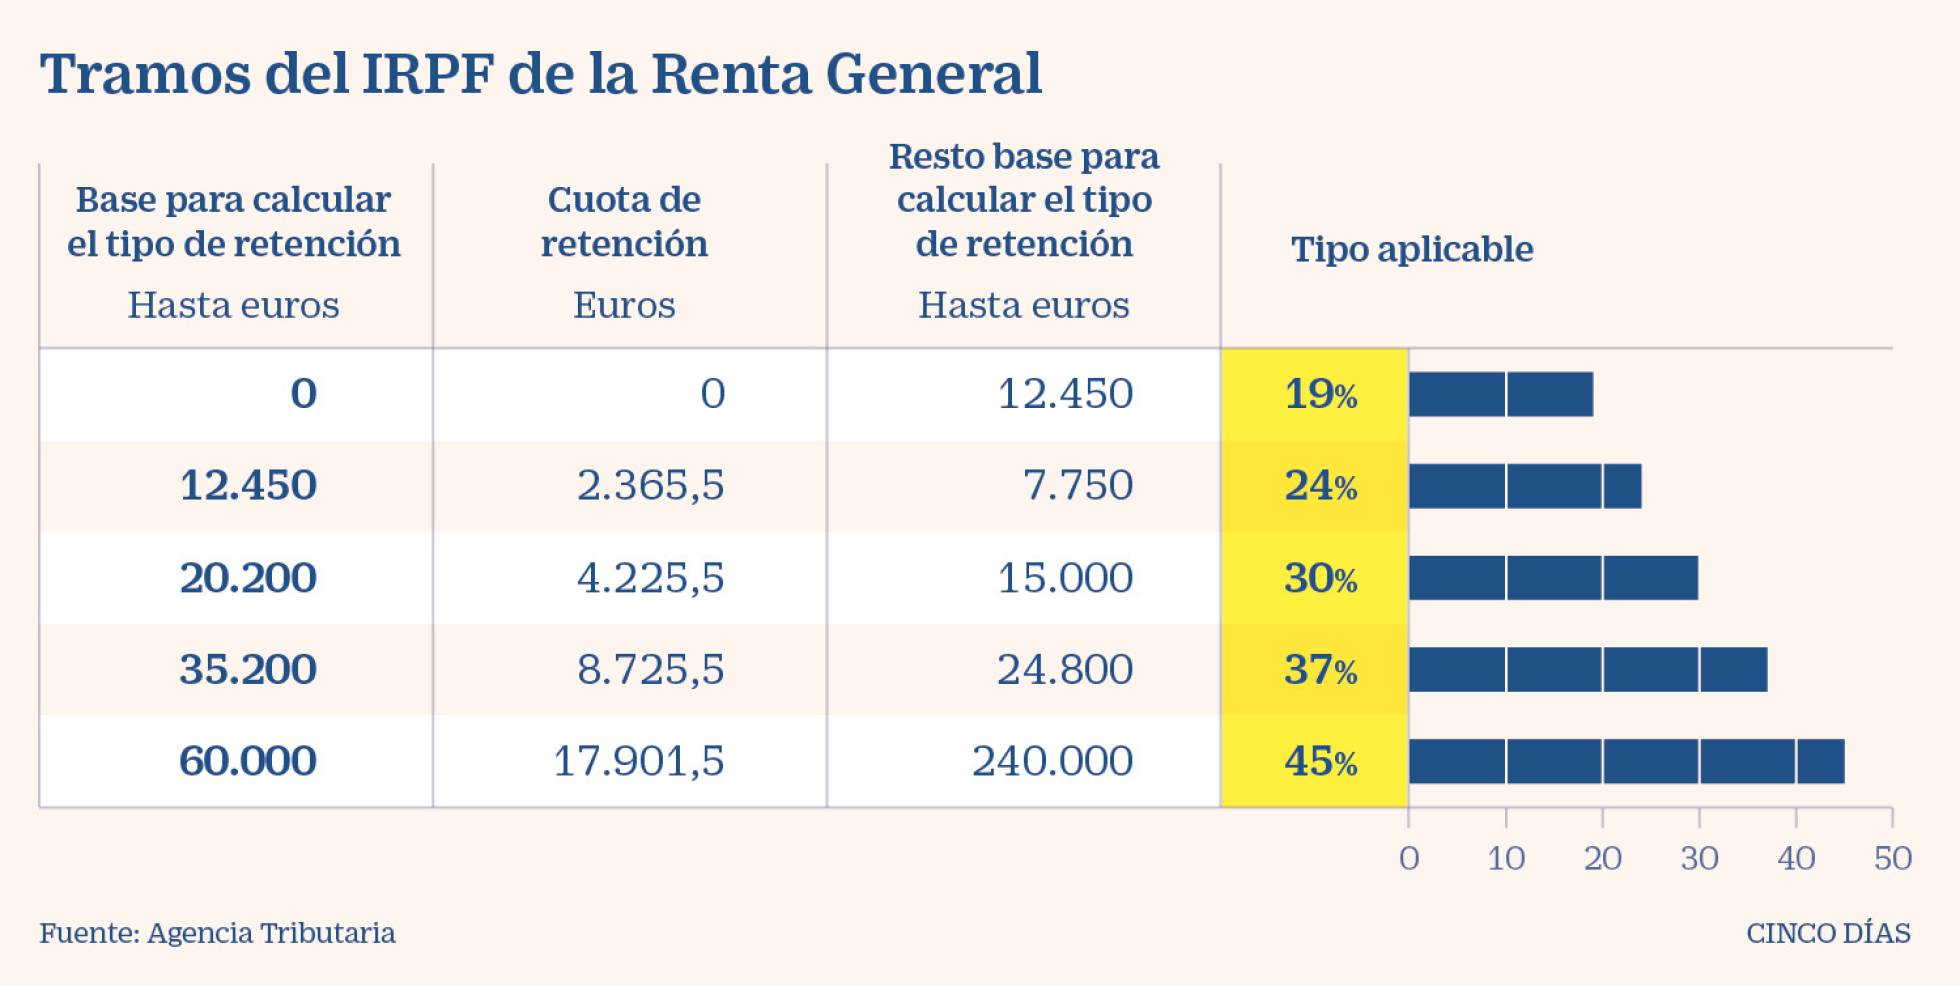
Cuando contratas la hipoteca puedes escoger tipo fijo o variable (mixto es una mezcla de ambos). Tipo fijo, como el nombre indica, se decide al inicio del préstamo y ya no cambia más. Solo puede cambiar si tienes bonificaciones por domiciliar nómina, etc. y dejas de cumplirlas.
Tipo variable depende del famoso euríbor. No voy a entrar al detalle de que es el euríbor, pero tomalo como un índice de referencia que puede subir o bajar y los intereses de tu hipoteca dependerán de ello. Por ejemplo imagina que tienes una hipoteca que tus intereses son “euríbor + 0,5%”. Pues si el euríbor esta a 3%, tu intereses anuales serán 3,5%. Normalmente se recalculan los intereses cada 6 meses o cada año.
La pregunta del millón, ¿cuál es mejor? la respuesta depende del contexto económico general y de tu caso particular. De antemano nadie sabe cual va a ser mejor así que toca un buscar el riesgo de la variable o a tranquilidad de la fija. Piensa además que puedes cambiar la hipoteca a otro banco durante el préstamo. Imagina que contratas una hipoteca a un tipo fijo alto y luego baja mucho el euríbor. Los bancos empezarán a ofertar hipotecas con mejores condiciones que la tuya, puedes cambiar. Se le llama subrogar. También es probable que si tu banco le enseñas que te vas te mejore las condiciones.
Dos cosas hay seguras en la vida, la muerte y los impuestos. ¿Que pensabas que no pagarías impuestos por comprar una vivienda? Pues claro que sí y no pocos. Si la vivienda es nueva es fácil, es una 10% de IVA. Si la vivienda es de segunda mano ya se complica la cosa. Como con el IRPF cada comunidad hace y deshace a su antojo y vuelve a ganar Madrid con solo un 5%. Muestro una comparativa por comunidad y los impuestos de todas las comunidades en un tab de la calculadora.
Finalmente, hay gastos de notaría, gastos de la inmobiliaria si usas una, etc. Es muy difícil estimar porque depende mucho del caso. En la calculadora he puesto un 3%.
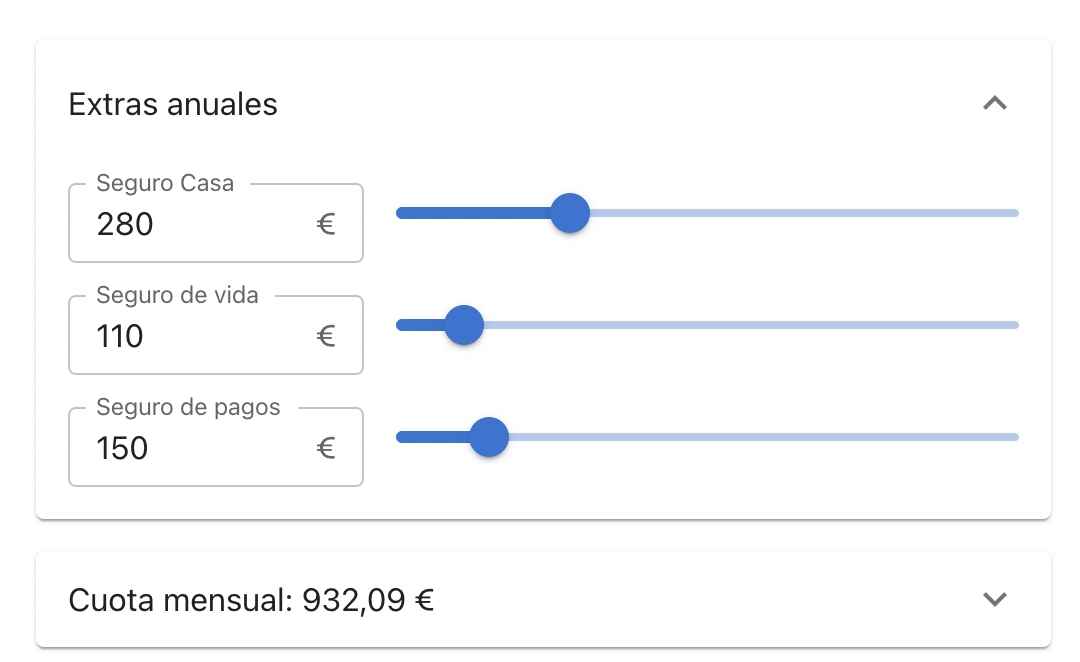
Hasta aquí hemos visto los gastos obligatorios. Pero el banco siempre quiere más. Al ganar tan “poco” con la hipoteca buscan colocarte varios seguros. Estos seguros te bonifican y te bajan tu tipo de interés. Hay que hacer números, no os precipiteis y calculad si vale la pena. En la mayoría de ocasiones es mejor contratar los seguros (si los necesitas) por tu cuenta. El único seguro obligartorio es el de la casa, ninguno más. En mi caso, me obligaron a contratar el seguro de casa el primer año con ellos. Al año siguiente lo dí de baja y conseguí un mejor seguro con más de 100 euros de ahorro. Repite conmigo, hipotecas en bancos, seguros en aseguradoras.
Lo que estoy seguro que no vale la pena nunca es poner los gastos de los seguros de todos los años dentro del préstamo de la hipoteca. Vas a pagar unos intereses inecesarios. Para facilitar los cálculos te pongo este apartado en la calculadora donde puedes ver como afectan la cuota mensual estos seguros extras.
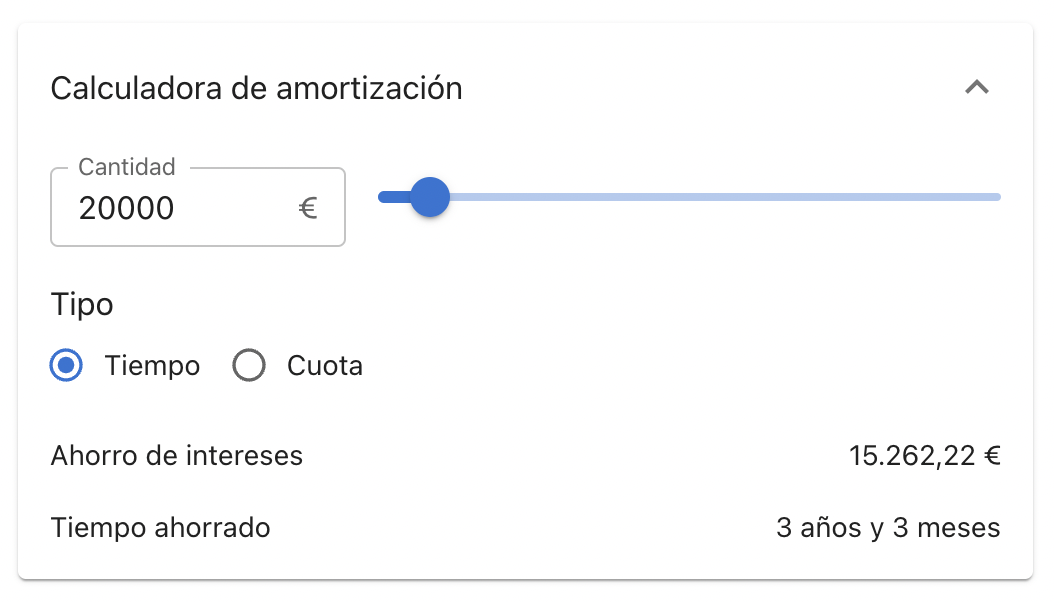
Amortizar es adelantar pago de tu deuda para que esta sea menor. Hay dos tipos de amortización. Una opción reduce la duración del préstamo (menos meses) y la otra opción reduce la cuota mensual. La opción con la que se ahorran más inteses es con la de reducir duración del préstamo pero va a gustos. Quizá interesa reducir una cuota muy alta que nos lleva ahogados. En la calculadora se pueden comparar ambas opciones
Hasta aquí esta breve introducción a la hipoteca. Es posiblemente el préstamo más importante que contrata una persona en su vida, que menos que entenderlo bien.
]]>Este año he combinado libros técnicos y novelas/no ténicos y haré dos podiums. He leído 3 libros técnicos, 1 lo he dejado y 2 los tengo en progreso. Novelas he leído 6 para un total de 9 libros. También he dejado una a medias y tengo otra por la mitad.
Claramente el que más me ha gustado ha sido Roma soy yo. No es la primera novela que leo de Posteguillo pero es que si además trata de una personaje como Julio César…mi único problema es tener que esperar al siguiente de la saga, este solo trata de su juventud.
en cualquier equipo de la elite del hockey —la flor y nata—, el 40 por ciento de los jugadores habrá nacido entre enero y marzo; el 30 por ciento, entre abril y junio; el 20 por ciento, entre julio y septiembre; y el 10 por ciento, entre octubre y diciembre.
Sus investigaciones sugieren que una vez que un músico ha demostrado capacidad suficiente para ingresar en una academia superior de música, lo que distingue a un intérprete virtuoso de otro mediocre es el esfuerzo que cada uno dedica a practicar. Y eso no es todo: los que están en la misma cumbre no es que trabajen un poco o bastante más que todos los demás. Trabajan mucho… mucho más.
La decepción del año me la llevé con Toda la verdad - Mike Tyson. Una vida tan potente muy mal explicada y con poco detalle para mi gusto. Lo dejé muy a mi pesar. Ojalá hiciera una el mismo autor que la de Agassi.
Como mejor libro técnico me quedo con The Art of Unit Testing de Roy Osherove. Ya escribí una entrada sobre los aprendizajes.
Seguido de cerca pondría The pragmatic Programmer el cual es un clásico y ya tardaba en leerlo. Enseñanzas muy buenas aunque me parecieron prepotentes por momentos.
Monolith to Microservices me gustó pero creo que es útil cuando estas en ese momento migrando un monolito a microservicios que no es mi caso. Por último, Working Effectively with Legacy Code lo abandoné porque no estoy trantando con código tan legacy actualmente que lo necesite.
Sigo leyendo la misma base de blogs que os comenté el año pasado. Los artículos que más me han hecho pensar sin duda son los de Morgan Housel. Os recomiendo TODOS pero si tengo que escoger solo uno, es How People Think.
2020 17 entradas, 2021 8 y 2022 6 + 1. Vamos a ver lo más visto
2020:
2021:
2022:
Más abajo ya hay versiones en inglés de dos entradas de arriba, que las contabiliza diferente y la única entrada que he hecho este año que entra en el top 10 es How to book andjoy classes automatically que pienso que quizá en castellano hubiera tenido más éxito.
]]>Imagina que tienes una oferta de trabajo, un nuevo sueldo bruto anual que suena tentador, pero ¿Cúal es el neto mensual? ¿Cuál es la subida salarial exacta? Imagina que puedes comparar tu sueldo actual con el futuro simplemente arrastrando un slider, te traigo la solución:
:moneybag: Calculadora de sueldo neto
Si eres como yo, para calcular el sueldo neto a partir del bruto recurrías al primer resultado de Google. Sin parar de hacer scroll arriba y abajo, refrescando la página que por cierto, es poco usable desde el móvil.
Y si querías hilar fino, te creas un Excel con la típica tabla de tramos y te lo calculas manual:
¿Ya está, no? Pues no no…para calcular bien el sueldo neto de verdad hay muchos más detalles a tener en cuenta.
Un día quise derrotar ese dragón y entender lo mejor posible como se calcula. Mientras investigaba he ido desarrollando esta calculadora de sueldo neto para validar lo que iba aprendiendo. Le faltan muchos casos y la UX es abominable pero he priorizado que sea cómodo de usar y soy nefasto haciendo UX. Agárrate que vienen curvas.
Hay un especie de leyenda urbana que dice: “Si te suben el sueldo y cambias de tramo puedes acabar cobrando menos”. La he escuchado varias veces y explica muy bien que poca educación financiera hay en las escuelas, supongo que es más importante aprender que una persona separó los mares y multiplicó los panes…bueno, que me lío.
NO.
Es imposible que una subida de tu sueldo implique ganar menos en neto. Los tramos son acumulables. Ejemplo, imaginemos que Paco cobra 30.000€ brutos al año:
Los primeros 12.450€ tienen 19% de retención. Lo que va entre 12.450€ y 20.200€, es decir, los siguientes 7.750€ tienen el 24% de retención. Finalmente, la diferencia entre 26.095€ y 20.200€ => 5.895€ le retienen el 30%.
Siempre la primera parte del salario va a tener un retención mas baja y sube progresivamente en cada tramo. He intentado mostrar esto mediante gráficos en la calculadora, pruébala.
Si has estado leyendo con atención, te habrás dado cuenta que la última resta no uso 30.000€ y uso 26.095€. Uno de los motivos son los gastos.
Hay un mínimo de gastos de 2.000€, todos los calculos deben hacerse restando incialmente este valor del bruto, en el caso de Paco, tras restar los gastos nos quedan 28.000€. Pero esta cifra aún no es 26.095€, ¿qué falta? Seguridad Social.
Aparte de los gastos, otro concepto a descontar antes de calcular el IRPF es la Seguridad Social. Esto debería ser facil, es el 6,35% pero con un matiz, hay un mínimo y un máximo. El máximo se alcanza con 48.841€ brutos anuales, todos los sueldos a partir de ahí pagan lo mismo. El mínimo* es 12.600€ brutos anuales.
A Paco le queda un pago a Seguridad Social de 1.905€ que si se lo restamos a 28.000€ ya tenemos la cifra que he usado en el cálculo anterior. Vamos a ponerle nombre a todo.
Base imponible = Salario Bruto - Gastos - Seguridad Social
26.095€ = 30.000€ - 2.000€ - 1.905€
Ahora si, con la base imponible ya podemos calcular el IRPF.
Las calculadoras online normalmente solo te muestran unos tramos de IRPF. Esos tramos son los estatales y aplican a todos excepto vascos y navarros. Lo que no solemos tener en cuenta es que cada autonomía tiene sus tramos, y en TODAS son diferentes. Mira el desglose de los tramos IRPF de cada comunidad autónoma de España en la pestaña correspondiente.
La tabla Estatal típica solo aplica a españoles no residentes, si resides en territorio español, se usa la tabla de tu comunidad y la estatal (con la mitad del porcentaje en cada tramo). Fíjate en la imagen como los porcantajes estatales ahora son 9,5%, 12% y 15% en lugar de 19%, 24% y 30%.
Siguiendo el ejemplo de Paco, si viviera en Barcelona, tendríamos el siguiente IRPF:
Si estas haciendo los cálculos por tu lado y no te cuadran los números es normal, mira el siguiente punto.
Posiblemente te suene la cifra 5.550€. Es el mínimo deducible. En el caso más común, persona soltera sin hijos etc., tiene ese mínimo deducible. Para deducirlo se aplican los tramos también. Es decir, para saber cuanto nos podemos deducir si vivimos en Cataluña tenemos que aplicar los tramos del estado y de la autonomía a la cifra a deducir. Ejemplo:
5.550€ está tanto en el primer tramo del Estado (hasta 12.450€) como de Cataluña (hasta 12.450€), por lo tanto se aplica el tipo del primer tramo:
A los impuestos totales del estado se les resta la deducción calculada, igual con la autonomía.
IRPF = IRPF base imponible (tramos) - deducciones (tramos)
Este es el caso estándar, las deducciones aumentan por cada hijo, por cada ancestro dependiente, etc. He recogido algunos de estos casos en la calculadora de sueldo neto, pero me quedan varios por añadir.
Imaginemos que Paco tiene gemelos, 2 hijos de menores de 3 años. Pues las deducciones aumentan hasta quedar:
El sueldo neto mensual con 12 pagas resultante es 2.009,55€, que comparado con el sueldo sin hijos (1.920,39€) resulta en 42,5€ más al mes por tener dos hijos menores de 3 años, no se si llega para los pañales.
He añadido en la calculadora este dato
Ten en cuenta que estoy asumiendo que Paco hace una declaración individial, por lo tanto la deducción es del 50%. Si la hace conjunta (solo casados), obtiene el 100%, el doble de deducción que individual.
La fórmula final para el cálculo de tu sueldo neto es la siguiente:
Salario Neto = Salario Bruto - Gastos - Seguridad Social - IRPF Estatal - IRPF Autonomico
Con los matices ya comentados:
Espero haber aclarado un poco como funciona este cálculo, es importanto conocer esta información.
A partir de aquí ya hablo de otros conceptos muy importantes a tener en cuenta cuando hablamos del sueldo.
Paco hace un trabajo excelente y le dan un bonus extra de 2.000€. ¿Cuánto recibirá en neto nuestro amigo? La tentación es calcular con el porcentaje de IRPF que paga del total del salario (16,83%). Pero es erróneo, como todo funciona por tramos, ese ingreso extra va directo al último tramo, el tramo marginal, que en este caso es de 30%. 15% estatal y 15% autonómico. Por la tanto el neto del bonus será 1.400€. He añadido el tipo marginal en los detalles:
Cuando tenemos 14 pagas en lugar de 12. Las mal llamadas “pagas extras” son más grandes porque no se les reduce la seguridad social. La seguridad social es paga en 12 pagas siempre.
Para poder ver la diferencia real entre comunidades he añadido un gráfico donde se puede ver cual sería el salario neto en cada comunidad y la diferencia con la comunidad seleccionado. Cuando tu bruto son 30.000€ parece que Cataluña es casi la comunidad con mas carga impositiva. Madrid donde el sueldo neto sería superior.
Imagine that you have a job offer, a new annual gross salary that sounds tempting, but what is the equivalent monthly net salary? What is the rise from your current job? Imagine that you can compare your current salary with the future one by simply dragging a slider, I bring you the solution:
:moneybag: Net Salary Calculator
If you are like me, to calculate the net salary you used to pick the first result of Google. Scrolling up and down all the time, bad UX, refreshing the page that by the way, it’s not mobile friendly.
And if you wanted to go one step further, you created an Excel sheet with the typical sections table and you calculated it manually:
So…that’s it? Well no … to calculate well the net salary, there are many more details to consider.
One day I wanted to defeat that dragon and understand as much as possible how it’s calculated. While I was investigating, I have been developing this net salary calculator to validate what I was learning. Many cases are missing and the UX is abominable but I have prioritized the usability and I suck doing UX. Brace yourselves.
There is a urban legend that says: “If your salary raises and changes to the next section, you can end up earning less.” I have heard it several times and explains very well the little financial education there is in schools, I guess it’s more important to learn that a person split the seas and multiplied the bread … well, I stop before I lose focus.
NO.
It is impossible that a raise of your salary ends up with you earning less net salary. The sections are cumulative. Example, let’s imagine that Paco earns 30.000€ gross per year:
The first 12.450€ have 19% retention. What goes between 12.450€ and 20.200€, that is the following 7.750€ have 24% retention. Finally, the difference between 26.095€ and 20.200€ => 5.895€ retains 30%.
Always the first part of the salary will have a lower retention and increase progressively in each section. I tried to show this through graphics in the [calculator]https://tecalculo.com/calculadora-de-sueldo-neto
If you have been reading carefully, you will have noticed that the last subtraction did not use 30.000€ and used 26.095€. One of the reasons is the expenses.
There is a minimum expense of 2.000€. All calculations must be made by initially subtracting this value from the gross. In Paco’s case, after restoring the expenses, we are left with 28.000€. But this figure is not yet 26.095€ what is missing? Social Security.
Apart from expenses, another concept to discount before calculating personal income tax is Social Security. This should be easy, it is 6.35% but with a nuance, there is a minimum and a maximum. The maximum is reached with 48.841€ gross per year, all salaries from there pay the same. The minimum* is 12.600€ gross per year.
Paco has a Social Security payment of 1.905€ left, which if we subtract it from 28.000€ we already have the figure he used in the previous calculation. Let’s name everything.
Tax base = Gross salary - Expenses - Social Security
26.095€ = 30.000€ - 2.000€ - 1.905€
Now we can, once we have the tax base we can calulate the PIT.
Online calculators normally only show you some sections of the IRPF (PIT). These sections are for the state and apply to all except Basques and Navarros. What we do not usually take into account is that each autonomy has its sections, and it’s different for each one of them. Take a look at the different sections per community in the calculator tab.
The typical state table only applies to non-resident Spaniards, if residing in Spanish territory, the table of your community and the state (with half the percentage in each section) is used. Check how the Spanish percents are now 9,5%, 12% and 15% instead of 19%, 24% and 30%
Following the example of Paco, if he lived in Barcelona, we would have the following PIT:
If you are doing the calculations by your side and the numbers do not match it’s normal, look at the next point.
A number that may ring a bell is 5.550€. It’s the minimum deductible. The most common case: single person without children etc. has that deductible minimum. To deduce it, the sections are applied as well. That is, to know how much we can deduce if we live in Catalonia we have to apply the sections of the State and autonomy to the figure to be deduced. Example:
5.550€ is both in the first stretch of the state (up to 12,450€) and Catalonia (up to 17.707,02€), therefore the type of the first section is applied:
PIT = PIT tax base (sections) - deductions (sections)
We substract the deducted amount from the taxes (both state and autonomy).
This is the standard case, deductions increase by each child, for each dependent ancestor, etc. I have collected some of these cases in the net salary calculator, but I have several left to add.
Imagine that Paco has twins, 2 children under 3 years. The deductions increase:
The monthly net salary with 12 resulting payments is 2.009,55€, which compared to the salary without children (1.920,39€) is 42,5€ more per month for having two children under 3 years, I do not know if it’s enough for the diapers.
I added to the calculator this data
Note that I am assuming that Paco makes an individual PIT declaration, therefore the deduction is 50%. If you do it jointly (only married couples can), you get 100%.
The basic formula is as follows:
Net Salary = Gross Salary - Expenses - Social Security - State PIT - Autonomic PIT
With the details already commented:
I hope I have clarified a bit. I believe it’s important to have this knowledge.
From here I will talk about other very important concepts to take into account when we talk about salary.
Paco does an excellent job and they give him an extra bonus of 2.000€. How much will our friend receive in net? The temptation is to calculate with the rate of personal income tax paid out of the total salary (20.53%). But this is wrong, since everything works in sections, that extra income goes directly to the last section, the marginal section, which in this case is 30%. 15% state and 15% regional. Therefore the net of the bonus will be 1.400€. I’ve added the marginal type in the details:
When we have 14 payments instead of 12. The so-called “extra payments” are bigger because social security is not reduced. Social security is always paid in 12 payments.
In order to see the real difference between communities I have added a graph where you can see what the net salary would be in each community and the difference with the selected community. When your gross is 30.000€ it seems that Catalonia is almost the community with the highest tax burden. Madrid, on the contrary, where the net salary would be higher.
Configuring the dev environment can be difficult. One example is this blog, it requires ruby, some “"”amazing””” rubygems, etc. configuring it in MacOS is hard, in Windows is directly a nightmare. Recently, I tried to write a post from a new laptop, the moment I saw I could not build the jekyll site I desisted. I pushed to a branch and built in another machine. Then I learned about Visual Studio Code Dev Containers.
So can I configure a container and build my blog directly there? Can I forget about configuring Jekyll in each machine I want to blog from? Yes you can!
Ok cool, but how do I configure the container? that will be hard! well, I have good news, there are predefined examples and the Jekyll one works out of the box. Check the documentation, you just need to:
F1
)Dev Containers: Add Dev Container Configuration Files
Jekyll
oneOne of the requirements to run VS Code Dev Containers is having Docker Desktop. If you don’t have it and you are using a Mac, I got you covered, meet Colima.
Steps to install:
brew uninstall --cask docker
brew install colima
brew install docker docker-compose
colima start
And that’s it, VS Code Dev Containers will works flawlessly. Be aware Colima by default uses 2 CPUs, 2GiB memory and 60GiB storage but this can be configured.
Once you get into the container there is no git anymore => To solve it, run git status
. It will suggest a command like git config --global --add safe.directory /path/to/repo
. Run it and git will be back.
I’ll keep an any for more automated containers, they can be super helpful when the environment configuration is complex. Are you planning to use it for any of your projects?
]]>Some weeks ago I finished reading The Art of Unit Testing by Roy Osherove. I really loved and I wanted to do a summary but I’ve been lazy lately busy with the tecalculo.com calculators. As usual, the summary is in Books collection but I’ll do a more detailed one here.
Reading this books has been humbling, I learned about some mistakes I have been making. Also the importance to calling things by their name.
I was taught, when I started doing test that a unit test was only meant to cover a method. That’s not completely true. Let’s define a Unit of work. A Unit of Work can span as little as a single method and up to multiple classes and functions to achieve its purpose. It’s completely ok to have a unit tests that implies a method that calls other method in another class as long as is the same Unit of Work.
I needed to clarify the Unit of Work concept so now we can define the difference between unit test and integration test.
Again, when I first learned testing, I just created “mocks” and then setup them to return what I needed in some cases. In other cases, I verified what parameters they were called with. Well, the tests could be working but I didn’t really know what I was doing completely.
When you setup an object to return something, what you are using is an Stub. When you verify an object has been called, what you are using is a Mock.
If you want to refer to both type of objects (Stub and Mock) then you should call them Fakes.
In my defense, I will say I tend to use Moq as testing framework and there they use Mock
name for both Stubs and Mocks, contributing to my confussion.
This is something I knew but never put a name of it. Types of tests, let’s go over them even if I think the names are pretty self-explanatory.
If possible, is preferable to do value based testing. If not possible, then state based. The least desirable since it’s the harder to test, interaction testing.
Tests should not have any logic. Conditional expressions, loops, etc. are a smell. But more important, test should cover only one concern. Ideally, each test should have only one Assert
, failing only for one reason.
How often have you asserted in the same test that the value returned is correct AND that the result is logged? Better to do two tests.
Another smell, having more than one Mock. Said with other words, having more than one fake verifying a behaviour. If you need two, create two tests. Again, in Moq it can get confusing because Stubs are called “Mocks”.
Last example, doing an Assert for each property of an object, is much better to an expected object and compare only once with an Assert.
Setup methods should only have code that applies to ALL tests in the current class. I’m guilty as charged of puting to much stuff in the Setup method. The key idea to remember: Each test should setup its own mocks and stubs, not needing to jump to the setup to understand.
As a closing, when writing tests we should try to make it “FICC compliant”. The FICC properties are: fast, isolated, configuration-free, and consistent. If it’s hard to write such a test, or if it takes a long time to write it, the system isn’t testable.
]]>Find the script here Highlights to Markdown, enjoy!
I’m lucky to have an O’Reilly subscription paid by my employer (thank you Trainline!). When reading books from the tablet, I like highlighting interesting stuff all the time. It’s my way of filtering the most important information and re-read it when needed. But how can I extract this data?
Going to my O’Reilly profile, I realized all the highlights I made were stored there. There is a link to export them as a csv file:
Recently, I created an script to parse the highlights from Kindle so I decided to extend it to support O’Reilly too.
Converting the csv to an object was a different process than in kindle since the source is a txt file. But once I have an object I could reuse the logic that creates the Markdown file. Check out the resulting code in Highlights to Markdown. In the books section there are already some O’Reilly highlights added like The Art of Unit Testing.
Pro:
Con:
When reading from the Kindle app instead of a Kindle device, another kind of file can be generated. It’s HTML instead of txt. It will be my next update to this script. I’ll keep you posted!
]]>In most gyms/crossfit places, for some activities, you have to book them since there is a limited amount of people that can go. In my case, I tend to go at 7pm and I can start booking since 48h before. If you forget to book it, in around 30 minutes the class is full and you can’t assist anymore.
I had tried to put an alarm, a TODO list item, eveything…but sometimes I’m far away from technology at 7pm on a Saturday and then I miss the booking “time frame”.
Not anymore, meet the “andjoy autobook script”.
Using andjoy via web I realized there is an API I could call to book the classes.
I started playing with Postmand and quickly replicated the calls I needed. There are two:
events
- POST
- Will give me the events for a given day and time frame.bookings/book
- POST
- With the event Id retrieved in the previous call, I will do the bookingKnowing which calls to do, next step how can I run them automatically? I quickly thought about a node script in Gitlab.
Why? Node scripts allow to make API calls easily and Gitlab has scheduled builds that work really well in my experience.
I uploaded the script to a repo: andjoy autobook class. I’m not winning any naming contests. To make it work you have to initialize the env variables with the corresponding values. Being the Cookie the most important, otherwise you won’t have access rights.
To retrieve it look in your browser network traffic when using AndJoy via web.
Finally, let me show you and example of a successful booking:
I hope you enjoy it and I hope you don’t go to the same crossfit gym as me 😃
]]>Well, Google did it again. They are migrating the G Suite to Workspace and the free option is going to disappear (remember Google Photos?). So I started looking for alternatives.
One good candidate was Zoho, it allows you to have custom domain free email. Only problem, once I had everything set up I noticed that in order to forward email to another account you have to pay extra. This is a no-go, I want to keep using Gmail.
I was seeing myself paying to have my email forwarded when I found forwardemail. This is a super basic service, there is no inbox or anything for your email, you just configure it and everything will be forwarded. Of course you can also configure “Send email as”. Just what I needed!
Do you have a professional and personal email accounts? have you considered using a custom domain?
]]>You can just set some text, a couple emojis and links. You will have a better profile than most of the people.
If you have a blog, it won’t hurt to show your latest posts.
But updating the README everytime you add a post? No! Are you crazy? Github Actions have you covered. It can check periodically for new posts and uptate your README accordingly. To create the Github action you need to create a file in the following path .github/workflows/blog-post-workflow.yml
. The contents in my case are the following:
name: Blog Posts
on:
# Run workflow automatically
schedule:
# Runs every hour, on the hour
- cron: "0 * * * *"
jobs:
update-readme-with-blog:
name: Update this repo's README with latest blog posts
runs-on: ubuntu-latest
steps:
- uses: actions/checkout@v2
- uses: gautamkrishnar/blog-post-workflow@master
with:
# comma-separated list of RSS feed urls
feed_list: "https://juan.pallares.me/feed.xml"
First the schedule is configured. With this configuration the workflow will check every hour for new posts. Then we use an action that simply needs the blog feed to check. See how I use the public workflow from gautamkrishnar. His profile is worth checking.
As a plus, I noticed that if the workflow does not detect changes in 60 days, it’s disabled. Github emails you an alarm. Nice reminder to keep writing posts in the blog 😄.
Finally, you can also add some cool stats about your Github usage. Since professionally I use a private Gitlab, my stats are not impressive.
In my case I just needed to add a couple lines directly in the README file
[![My GitHub stats](https://github-readme-stats.vercel.app/api?username=jpallares&count_private=true&show_icons=true)))](https://github.com/anuraghazra/github-readme-stats)
[![Top Langs](https://github-readme-stats.vercel.app/api/top-langs/?username=jpallares)](https://github.com/anuraghazra/github-readme-stats)
Notice how I set my github profile id (jpallares) as username. Check anuraghazra github for more details.
Ready for showing off some cool stats?
]]>